As I have been promising for a long time, here is a guide to make Iontophoresis device at home.
I have covered Iontophoresis machines, how these work, the options available in market etc in separate posts, so I would not repeat those here. However, you should check out my experience with homemade iontophoresis machine – it may help you to decide if its for you.
In any case, watch the following video that I created – apologies for the video quality! If I get enough interest in the video, I will update this with a better quality one soon.
Here are the items you would need to make the iontophoresis machine at home… its actually pretty easy, so give it a try. At under $40, it can save you some serious money!
WHAT YOU NEED
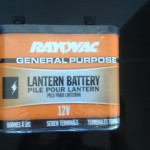
- Homemade Iontophoresis Machine – 12 Volt Battery
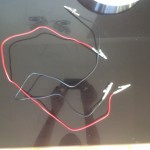
- Homemade Iontophoresis Machine – Lead With Alligator Clip
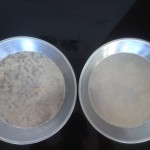
- Homemade Iontophoresis Machine – Aluminium Pie
- 12 Volt Battery – here is where you can find the one I used.
- Lead with Alligator Clip – I used these
- Aluminium Pie – these do the job well
WATCH THE VIDEO
If you liked this video, or if it helped you in some way, please leave a note! Good luck.
21 Comments
Hi Rohit,
I’ve been searching the internet for days now for information about hyperhidrosis. I am happy to say that your site is very useful, and I would like to send you a big “Thank You, Sir!” for taking the time to share your knowledge with the www community.
I would like to post you this brief question: “since iontophoresis acts like a electromotive drug administration (at least thats what I understood from Wikipedia), and we’re using salt and aluminium pies in the homemade machine, aren’t we sending aluminium chloride through the skin into the the blood current? If so, can we use a non aluminium recipient for the water without losing the treatment efficacy?”
If you wouldn’t mind, I would also like to know what materials do licensed companies use to build their machines.
Once again, a big “Thank You”
Vitor, Portugal.
Hi Vitor,
Thanks for the comment, and for appreciating the site – I do hope this is useful for others.
Anyways, coming to your question:
Note: I am not a qualified medical professional. So my observations below should not be taken as one!
1. Iontophoresis process does not breakdown the salt in Sodium and Chloride, much less enable production of Aluminium Chloride. So, I think that Aluminium Chloride being absorbed in the skin is not likely.
2. Typical iontophoresis process lasts less than 15 minutes on relatively mild voltage – I don’t think there is any real risk of Aluminium ions being passed in to your skin.
3. The over the counter antiperspirants (e.g. Gillette) contain Aluminium Chloride and are absorbed in the skin without significant side effects. I don’t think Iontophoresis is any more dangerous!
4. Most of the commercially available iontophoresis machines (e.g. Hidrex) use Aluminium or Steel electrodes. Where Steel is offered, its primarily for aesthetic purposes (as it does not dis-color) and not due to any risk from using Aluminium plates.
Hope this helped?
hi. first I would like to say thankyou for your help. I would like to know with the home made machine what can I do to make it work for my arm pits.
I think it is great what you have done here. One question: do you put salty water in the plate or just plain water? Thank you.
Hi Rohit,
Thanks for posting your video. Yeah, as you have mentioned the commercial ones are really dearer costing 600~1000$, with some fancy options serving the same purpose. Considering the battery life of home made ionto, does it maintenance costs reaches well over the commercial ones for lifetime treatment?
Nice Video demonstration – I have had the RA fisher for years and found (3) 9 volt batteries wired in series for a total of 27 volts works much better than the $700 RA fisher and I can just store them in a glasses case. I put together a similar home machine except with (3) 9 volt batteries in series. So total of 27 volts. Your body typically will allow around 20 to 25 milliamps of current just depending on body type. Females will normally allow more current than men. The 9 volt batteries typically store from 400 to 600 milliamp hours. So they can last close to 20 sessions. You can get connections for 9 volt batteries at any Radio Shack or electronics store. You of course need three 9 volt battery connectors. Wiring these connectors in series is simply just positive to negative and then use wire nuts or electrical tape. There you have it, now just plug connectors to batteries and use wires with alligator clips, one to the positive of the 1st battery and negative of the 3rd battery and follow your instructions. Easy to find online how to wire series vs parallel if you need a diagram. Wiring in series increases the voltage. If 3 batteries is too much, you can wire 2 batteries in series for 18 volts. Be careful not to let positive and negative ends touch.
For a compact home made machine. (3) 9 volt batteries wired in series for a total of 27 volts DC and store in a glasses case for example. Your body typically will allow around 20 milliamps of DC current just depending on body type. Females will normally allow more current than men. The 9 volt batteries typically store around 400 milliamp hours. So they can last close to 20 sessions at 20 or more minutes a side. You can get connections for 9 volt batteries at any Radio Shack or electronics store. You need three 9 volt battery snap on connectors. Wiring these connectors in series is simply just positive to negative and then use wire nuts or electrical tape. There you have it, now just plug connectors to batteries and use wires with alligator clips, one to the positive of the 1st battery and negative of the 3rd battery and follow instructions above with water and pie pans. Easy to find online how to wire series vs parallel if you need a diagram. Wiring in series increases the voltage. If 3 batteries is too much, you can wire 2 batteries in series for 18 volts. Be careful not to let positive and negative alligator clip ends touch or a short could create a fire. Typically treat 10 to 20 minutes and reverse just like other machines. FYI Do not travel with batteries connected. If they short, you could cause a fire.
Hi, I am rahman, 20th from Indonesia. I can’t spek English. My engglis very bad.
I have hyperdosis in my palm and feet since
childhood, and that’s very distubing my activities.
I need a friends discussion. Because I have
lot questions about iontophoresis device assembly,
Please Add my blackberry pin 7A94B823
or email [email protected]
or id line:
mr_geops (I please
add contact me),
i want ask a question?
I’ve bought equipment to made iontophoresis device, tell me,
if there are less precise
1. “Yuasa” accu/betery 12v 10 ah
2. cable and clips (for connector)
3. palte alumunium
4. salt
5. water
I look at the video youtube
him use aquaphor baby, i am not getting aquaphor in my location, does not
matter? Not use aquaphor baby.
After iontophoresis device already. When ever I try put my palm at seme times , I get
electro shock… is normal? (Make me scares use the device)
whether friends do experience the same thing?
how often do you replace the battery?
should you use special water like a temperature or something or like saline?
Where can i get bigger sized aluminum plates for the feet can u put a link?
Thanks a lot ! I believe you have it all worked out I your machine , it’s really a simple machine and people seem to be getting robbed for 1000$. I haven’t tried your machine but will be buying materials soon . Question , should I stay away from certain metals ? I need bigger plates so I can treat my feet. Thanks
How do I use it for the underarm , please
Clip to two moist sponges and hold one under each armpit. Some say to reverse the battery +/- after half the time. Let me know how it works out for you
Hi
Thank you so much… I have been using the one I built for five days now and I’m seeing great improvement I’m going to build a few of these for my cousins who are having similar condition.
Appreciate your effort sharing such great information .
Regards
https://uploads.disquscdn.com/images/869689adeedb34d6812c88eb1fe8e137134f4c946506412298403f9e7ca0e74b.jpg ,
Where did you get those mats and what exactly are they called? I’m not even sure what to search for.
i’ve had the materials to do this for about a year now but life got in the way and i’m just now able to get it all set up. how much water do you put in the pans?
Pingback: DIY Iontophoresis Machine Homemade – GizmoScene
what is adapter i have to buy for iontophoresis machine
The guy that I got the machine from (the homemade version of it) instructed me to put my hands into the water for 10 minutes, then REVERSE the current (the electrodes both pans were connected to are now switched) and put my hands in for another 10 minutes.
It makes each session last over 20 minutes though, and I havent seen that instruction anywhere else on the Internet.
Do you guys do it the way I described it? Do you pay attention to which electrode each hand is connected to every time? Does it matter at all?
What’s up to every one, the contents present at this site are truly amazing for people knowledge, well, keep up the good work fellows.
Good information. Lucky me I recently found your blog by accident (stumbleupon). I have bookmarked it for later!
Wow, wonderful blog format! How long have you ever been blogging for? you made blogging glance easy. The full glance of your site is fantastic, as smartly as the content material!